Hello, friends welcome to my site Mechical today’s topic deals with metrology in this topic we will know about Limits, Fits, and Tolerance.
In which we will know in detail what is limits, fits, and tolerance and also will know the types of limits, types of fits, and types of tolerances.
Before knowing limits, fits, and tolerances, First of all, we have to know the terminology which is used in limits, fits, and tolerance, So that we can better understand limits, fits, and tolerance.
When a machine is formed by combining the different types of metal parts together and it runs continuously to give output, but due to continuous working sometimes its parts get damaged, At that time, the stability with which the damaged parts get replaced by a new one is known as interchangeability of parts.
Interchangeability of the parts depends upon the many factors such as Limits, Fits, and Tolerance given between the mating parts.
Limits, fits, and tolerance plays the very most important role while designing and manufacturing any parts of a machine or elements.
So, in this topic, we will study the factors on which Limits, Fits, and Tolerance depend and their various related aspects.
So, let’s get started about limits, fits, and tolerance.
Terminology used in Limits, Fits and Tolerance
There are the following fundamental terms which are used in Limits, fits, and tolerance
- Basic Size
- Actual Size
- Deviation
- Allowance
 |
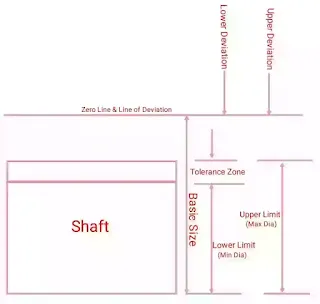
| Basic size, deviation and tolerance |
Basic Size
Basic size refers to the size of a job on which limitation is permissible.
Actual Size
The actual size of a job is referred to as the job size obtained after the machining of a workpiece.
If the actual size is lower than the lower limit size and greater than the upper limit size, the job will be rejected.
To assign and maintain the limitations and fits, there are many standard organizations but in India, BIS (Bureau of Indian Standards) is used.
Deviation
The algebraic difference between the size and basic size of the job is known as deviation.
Deviation can be positive, negative, or zero.
There are four types of deviations, which are discussed below.
- Upper Deviation
- Lower Deviation
- Actual Deviation
- Fundamental Deviation
Upper Deviation
It is the algebraic difference between the maximum diameter of the job size and the basic diameter of the job size.
By formulation, we can say that
Maximum diameter of the job − Basic diameter size of the job
Lower Deviation
It is the algebraic difference between the minimum diameter of the job size and the basic diameter of the job size
By formulation, we can say that.
Minimum diameter of the job − Basic diameter size of the job
Actual Deviation
The algebraic difference between the actual and basic size of a job is known as actual deviation.
Fundamental Deviation
Either of both deviations (lower or upper) , which is shown by adjustable relation with zero lines is called fundamental deviation.
Allowance
An allowance is the difference of the sizes or relinquishes the gap between two mating parts.
According to the fitting nature, the allowance will be positive or negative.
Allowances are of two types as follows the gap between two matings.
- Maximum Allowance
- Minimum Allowance
Maximum Allowance
The size of a difference between the upper limit of a hole size and lower limit of a shaft size is known as maximum allowance.
Minimum Allowance
The size of a difference between the lower limit of a hole size and upper limit of a shaft size is known as minimum allowance.
What are Limits, Fits, and Tolerance?
Limits, fits, and tolerance play the most important role when changing or replacing the parts.
And also Limits, fits, and tolerance are very important when we design and manufacture any part up to accuracy level.
So, let's know step by step what is limits, fits, and tolerance?
Limits
The maximum permissible tolerance size in the dimensions of the basic size of machine parts is known as the limit.
Exceeding the tolerance size of the job from the basic size is known as an upper limit and decreasing the length of the job, which is less than the actual basic size, is called a lower limit.
Fits
Fit is the relationship which is lies around two mating parts one is a hole and the second one is a shaft with respect to their dimensional distinction.
There are three types of fit, are as follows
- Clearance Fit
- Interference Fit
- Transition Fit
 |
| Types of fits |
Clearance Fit
It is a fit, which always provides clearance and the size of a hole is always bigger than the maximum size of the shaft.
Interference Fit
The interference fit is represented by the difference between the lower limit of hole size and the upper limit of shaft size.
Transition Fit
Transition is a fit, which may be clearance fit or interference fit because sometimes its provide clearance fit and sometimes interference fit.
When the allowance is positive, then the fit is clearance fit and when the allowance is negative, then the fit is interference fit.
ISI System for Limits and Fits in India, the act (IS 919-1959) under the British system is modified in 1963.
It has 18 series of basic tolerance to find out the different types of fits for the various types of diameters of shafts and holes.
It is represented by ITO1, ITO, IT1, IT2, IT16.
There are two methods for giving the desired allowance for fit, which are given below.
- Hole Basis System
- Shaft Basis System
Hole Basis System
In this method, the hole is stable, and its lower deviation is zero, which means the basic size of the hole is a lower limit size of a hole.
Shaft Basis System
In this method, the upper deviation of a shaft is zero.
The upper limit size of the shaft is basic size.
It is denoted by h.
For the measurement of the hole deviation, we use the shaft basis table.
Tolerance
It is the difference between the maximum diameter of the size and the minimum diameter of the size.
Here should be noted that tolerance always is positive and is only shown as a number without any sign.
By formulation, we can say that
Max. diameter of the work − Min. Diameter of the work
Tolerances can be divided into four parts, as follows.
- Unilateral Tolerance
- Bilateral Tolerance
- Fundamental Tolerance
- Geometrical Tolerance
Unilateral Tolerance
In this type of system, the dimension of a part is allowed to vary only on one side of the basic size of the work which means, the limits of tolerance on one side of the basic size of the work either above of the work or below of the work
Bilateral Tolerance
In this system, the dimension of the part is allowed to vary on both sides of the basic size.
Fundamental Tolerance
This is also called 'grade of tolerance', The grade standards are denoted as ITO1, ITO, IT1... IT6.
In order to represent the tolerance size, the basic size is written first.
Fundamental tolerance has
Fundamental deviation, grade of tolerance, and basic size.
Geometrical Tolerance
Geometrical tolerance is the maximum permissible variation of form and position of any object.
It is of three types such as.
- Form tolerance
- Attitude tolerance
- Location tolerance
Newall System of Limits and Fits
The newall system is providing the tolerance of different types of fits for the hole size from 1/2" to 6".
This system is also based on a hole basis system.
The hole size is kept stable and tolerance is provided according to the fitting in the shaft.
According to the accuracy of the job, the tolerance is divided into two parts.
A series
A series includes the high accurate tolerance works.
B series
B series includes all general tolerance works.
Conclusion
I hope you all like these topic Limits, fits, and tolerance, if any query you are free to comment in the comment section.
FAQ For Limits Fits and Tolerance
What is the difference between tolerance and allowance?
First, tolerance is the permissible variation in the dimensions of a component (hole or shaft), while allowance is a difference determined between the dimensions of two mating parts.
Secondly, tolerance is the difference between the higher and lower limits of a dimension depending on the manufacturing capability of a machine. With regard to allowances, this is an intentional difference between the lower limit of the hole and the higher limit of the shaft.
Third, tolerances on a part are intentionally provided on the dimensions of a part, as it is not possible for a machined part to be manufactured to the exact size.
An allowance is made to the dimension of a mating part to obtain the desired type of fit.
Finally, tolerance is an absolute value, whereas allowance can be positive or negative.
What is the difference between tolerance and clearance?
The difference between tolerance and clearance is that tolerance is the allowable variation of a dimension from its desired value while clearance is the distance between adjacent surfaces of the mating parts.
What is the difference between limit and tolerance?
The two extreme permissible sizes of a part between which the actual size lies are called limits while tolerance is defined as the total allowable variation of size.
If the allowance is negative, which of the following interference is true between the mating parts?
Allowance is the difference between the sizes of the mating parts. It depends on clearance and interference. When allowance is negative it results in maximum interference between mating parts.
If the allowance is positive, which of the following interference is true between the mating parts?
Allowance is the difference between the sizes of the mating parts. It depends on clearance and interference. When allowance is positive it results in minimum clearance between mating parts.
Why are limits and fits important?
Limits and fits play a very important role when designing and manufacturing any part of a machine or element.
How many types of tolerance are there?
Tolerances can be divided into four parts: unilateral tolerance, bilateral tolerance, fundamental tolerance, geometrical tolerance.
What are different types of fits?
There are three types of fits clearance fit, interference fit, transition fit.


0 Comments